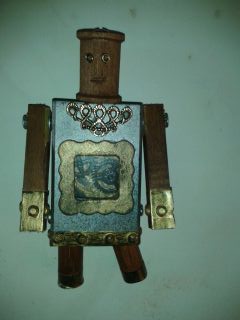
Just finished finished this guy while enjoying the Thanksgiving holiday. He had been kicking around in a mostly complete state for a few weeks, but I just ironed out the last touches a few days ago...and love it. I'm calling him Click-bot...
He stands about 5 inches tall and has a magnet on his back for guarding refridgerators, metal filing cabinets, etc. He is one of the more craft-y-ish things I've done, so far. His body is a clear plastic candy container with wooden dowels for the arms and legs. His head is a modified thread spool. There are few gears in his tummy, which can be seen through a framed window on his front.
Here is a picture of how he looked originally, before rummaging through my parts bins, and making a few modifications.
I cut off the bottom of the head, at my wife's suggestion, to make it less spool-like. Also, added a few square brads to creat some ear action and give the sides of his head some interest.
I had carved a line in for the mouth, but thought it needed more charcter. The chin piece is made of painted electrical tape and gives it more a functional feel. The head was originally a character-less transparent dome with an antennae inside (not pictured, and now disassembled). Fortunately, I decided to go for something more charming and anthropomorphic.
The clash of wood and metal(lic-painted plastic) was very striking, and I think is 100% of the charm of this piece. The other cool part is his tummy; it has a clear window so you can see the gears, and such...
There are a couple of metal clockwork gears that can be seen through the tummy window. The window was masked off when I painted the rest of the box, and then a scrapbooking frame was added to hide the mask lines and give the body some texture. Inside are a couple of clockwork gears layered over pieces cut from a gold doylie. The layers are seperated with thin sheets of tranparent plastic to provide a feeling of depth.
The other key element that I like here are the golden bands and bolts on the waist, arms, and feet (which have no bolts). The bands are painted electrical tape and adhesive gems. They are applied, painted black and then a quick go-over with gold paint and a dry brush. The main disadvantage here, like with most applied items, the gems pop off, and don't always take paint well. So, from now on I will move on to metal brads when ever possible, since they already look the part and have a pin that can be punched through the model and glued in place. Live & learn...
Anyway, that is the process, more or less. I definitely see an army of robots coming soon; very likely to storm a table at a local convention or craft show.
A gallery/chronicle for my Ray Gun Art, drawings, and other related craftiness.
Monday, November 26, 2012
Monday, November 19, 2012
New Ray Gun
Hard to believe that more than a year has passed since my last entry. Work and a move into a new house has made it difficult to finish any projects, but I have a new work shop and the mad sciencery has resumed.
This is a slightly more ambitious project than the previous ray guns, as it is not a mod of an existing gun toy. Now that I can spread out and have a place for the power tools, I was able to cut a custom handle as the base for the gun. Two important things here, not using a toy gun means that this handle is cut for bigger adult hands, which means the ray gun itself is a great deal larger than the other projects. Also, it is a really comfortable grip.
It was more convenient to use my phone for these picks, but I'm not super happy with the way they came out. I may add some better quality shots later, but these will do for now.
Here are the basic parts laid out. Still using some of my favorite tricks and pieces, but a few new moves as well. I love the shape of these craft bottles and they come in a variety of sizes and are pretty cheap. I also love being able to toy with transparency, so I masked the spot between the muzzle and body to create a see-though cylinder. In the cylinder, I placed a bundle of tubing and wires to make it look kind of weird and high tech.
I added some interesting flair pieces on the muzzle, and dry brushed gold paint on some of the accent pieces. So far, one of my favorite pieces. I'm working on a similar gun now, with a few variations in the details. I will definitely be cutting my own grips from now on, though I will still have to use up my rediculously large stock of toy guns at some time, or another.
This is a slightly more ambitious project than the previous ray guns, as it is not a mod of an existing gun toy. Now that I can spread out and have a place for the power tools, I was able to cut a custom handle as the base for the gun. Two important things here, not using a toy gun means that this handle is cut for bigger adult hands, which means the ray gun itself is a great deal larger than the other projects. Also, it is a really comfortable grip.
It was more convenient to use my phone for these picks, but I'm not super happy with the way they came out. I may add some better quality shots later, but these will do for now.
Here are the basic parts laid out. Still using some of my favorite tricks and pieces, but a few new moves as well. I love the shape of these craft bottles and they come in a variety of sizes and are pretty cheap. I also love being able to toy with transparency, so I masked the spot between the muzzle and body to create a see-though cylinder. In the cylinder, I placed a bundle of tubing and wires to make it look kind of weird and high tech.
Now, I did experiment with a few different techniques. First was the hanlde, but I also covered the body of the bottle with strips of electrical tape to give the impression that it was made of metal plates. I punched holes through the tape and bottle to insert small metal brads. Once the spray paint was applied, it looked like metal plates and rivets.
One interesting thing about electrical tape is that the coating does not appear to like spray paint too much, and the paint never really dried. It was tacky for days, so I eventually opted to dry brush on some acryllic silver metallic paint. Problem solved.
I added some interesting flair pieces on the muzzle, and dry brushed gold paint on some of the accent pieces. So far, one of my favorite pieces. I'm working on a similar gun now, with a few variations in the details. I will definitely be cutting my own grips from now on, though I will still have to use up my rediculously large stock of toy guns at some time, or another.
Saturday, June 11, 2011
OK-This one is a toy...
I built this one with my six-year old over my shoulder the whole time. I got him to help me paint it and pick out parts for it. When I was done, I gave it to him; he couldn't believe it and spent the day zapping imaginary aliens.
This is mostly a repaint, with a new tip and an antennae thrown in for good measure. It was more an experiment to see what I could do with this base. Have some ideas for future projects later down the road.
Still a pretty smart-looking ray gun...
Tuesday, June 7, 2011
New Ray Gun
This is the newest addition to the arsenal, and is one my favorites. Its mostly a repaint of a toy gun I found at the store, with some additions fastened throughout. I started working on it around the time that I made the first batch of guns, and it looked more like this:
There had been a slit in the back of the casing where a tension lever stuck out to help propel darts. I took the lever out and covered it with electrical tape. I then added adhesive brads to the tape to resemble bolts.By the time I painted it, it looked pretty good. Still pretty cool, but I wanted to add some more to it; the hole in the grip was bugging me a bit.
The green nodes are screw covers stuck to a decorative coat button, with little metal doodads glued to the ends.
I added a washer and a toy antennae-ish thing to the barrel. I found a cool meshy material that fit over the gap in the handle, and the gun started coming together. There was a fin at the front of the barrel that I shaved off so that it would holster better.
Overall, it came out pretty good.
Monday, June 6, 2011
Steam-Bot!!!
I call this guy Steamhead, and I built him about a year ago, but just finished the paint job recently. He is truly an assemblage piece, using all sort of plastic odds & ends and mostly held together by a bunch of wire, and some good fortune.
I love the pot-belly stove look and the steampipe for a head. The face came out rather well, and definitely has a victorian gentlemanly look. The mustache cracks me up...
Again, a bunch of random pieces and clippings from other items. The mouthpiece is actually part of a foil doily (I think).The head was originally going to hang from the chest on a rod and look much more menacing. I'm glad I went this way with it though; he looks much cooler like this.
For some reason, I don't have pics of the back. There is keyhole in the back, that actually fits a small key. Sadly, the key doesn't really do anything; you'll just have to use your imagination.
Saturday, June 4, 2011
Book Cover Above the Aether...
The premier of my friend Win Strock's steampunk novel is quickly approaching and now has a cover (which sadly, I didn't provide), but it is pretty good nonetheless. Very excited...
He also runs a cool blog as well, and is worth checking out:
http://adventures-above-the-aether.blogspot.com/
Cheers.
He also runs a cool blog as well, and is worth checking out:
http://adventures-above-the-aether.blogspot.com/
Cheers.
Sunday, May 29, 2011
Steampunk Art Groups
I've been on deviantArt.com for a while now and some of my work has been added to a couple of retro sci-fi groups; a very awesome community. Some very cool steampunk and related objects of curiosity there. Check them out...
http://dieselpunkmachine.deviantart.com/
&
http://nikola-teslapunk.deviantart.com/
http://dieselpunkmachine.deviantart.com/
&
http://nikola-teslapunk.deviantart.com/
Subscribe to:
Posts (Atom)


