Thursday, April 11, 2013

Pocket Ray Gun


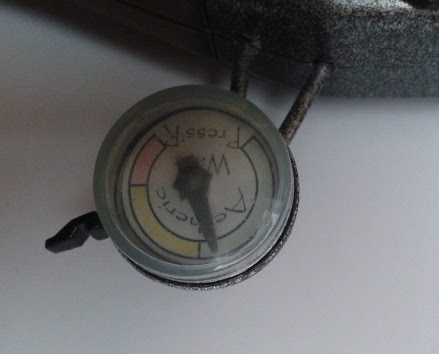
Though I'd been toying around with a compact pistol for a while, this particular piece didn't take long to make at all. I had wanted to make a pistol where the handle had a door in it, with a setting dial, but I had a lot of trouble making it work. I kept the general grip size and shape, but settled for an inset gage, which I think looks pretty good.

The barrel is a wooden chair leg, with maetal brads and some plastic do-dads glued on.


I tried to keep it pretty simple, but elegant. I have had trouble with smoothing and rounding the edges of the handles using a table sander. On this piece I tried the sandpaper tip for the Dremel and it worked great.


 On the flipside I added some decorative flourish, and...


...some silver foil doiley from decorative trim.
 
Hope you like it, and keep zap'n!!!

Monday, April 8, 2013

Legions Above the Aether


http://www.amazon.com/dp/B00C60621I#_

My good friend Winfield Strock has now published his second historicalish/steampunk novel Aether Legion. It currently exists in a reasonably-priced electronic state, but will soon be irrevocably transfixed to paper and bound for your reading enjoyment.

-Good job, Win!
-Enjoy, everybody!

Sunday, April 7, 2013

Rock'em Sock'em Robot Pin


Made this from a toy ring (well, half of one), based on the famous fighting game. The head doesn't move, but there is a switch on the back that makes the arm spring up.


Here is a close up of the pin. Its about 1 3/4" tall. Thinking about using it as a tie tack. This is one of those "puts a smile on your face projects". Lots of fun to make. Hope you like it.

Keep zap'n (sock'n)...


Saturday, April 6, 2013

Silver & Gold


I didn't realize how long this one had been sitting on the self, but apparently I started working on it around Christmas. I had gotten the idea for this ray gun while working on another with a similar body shape. I wanted the end to be a setting dial that you could twist, but I had a hell of a time getting it to work right, so it sat on a shelf until this morning, when I finally figured it out.
 
Here is the earliest WIP picture. Still using plexiglass for the fin here, though I have tried some other options since. The fin is a good thickness, and pretty tough, but it is a bitch to cut. Using wood for the barrel. I tried sealing the barrel to keep the grain from giving away that its wood, but that didn't work out very well; I eventually just wrapped the big pieces in electrical tape.
 

Here is a pic with the twisting dial set in the back. I use a template for my wooden grips, but the normal handle style interfered with the dial. So, I had to create a grip that kept the hand off of the dial , but was still organic and comfortable.

Then business as usual; paint-paint-paint, glue-glue-glue, and it was done.


I just could not stop adding gold accents to this peice. The intensiometer was a new direction that I've been wanting to try for a while; I really love the way it came out.


The whole back piece of the body is the setting dial, and it twists under a gold-painted and stylish arrow. The idea for the mechanism is a few months old, but most of the finishing touches were concocted today.

Glad it is finally finished, hope you like it.

Keep zap'n!!!


Wednesday, February 20, 2013

Ray-Rifle

BY JOVE, IT IS FINALLY FINISHED!!!


THE EXTINCTOR

This is actually one of the original projects that I started when I took up this hobby, about two years ago(?). I took a number (a rather large number) of very long breaks while building this piece and would come back to it when I was stuck on other projects. The Extinctor is a toy mod, and definitely the most ambitious piece I've made so far. It measure 29 1/2 inches long and is almost entirely repurposed toys.

Sadly, I wasn't taking WIP picks when I started this project, so I do not have any behind-the-scenes shots. I do have a number of detail pics, since I had to stand pretty far away to get the entire piece in the above picture.


There are so many cool parts to this piece, but the barrel is definitely one of my favorites. It is mostly a single toy mounted on a curtain rod. It is a very strange toy, and I would laugh very hard if someone actually recognized it.
 
 
This part was the most fun to build, because it is completely from scratch, and is made up a number of toys and what-nots that just kinda came together to form the antennae assembly.
 

The gear box was one of the last things I added; I wasn't really working with gears much when I first started this hobby. This was a solid piece that you pumped like an air gun. I cut out the "window", which was where a logo sticker used to go, and added some decorative doylie and gears. Its topped off with some blister-pack plastic, which is very light-weight and pretty easy to work with. Love the blister-pack material.


The crystal chamber is on the other side of the gear box, and not visible from the main picture. I had some crystals and other wierd parts lying about, so I thought I'd put them together and see what I got. Well...I got that. Not my favorite part, but its kooky, so I like it.

 
I really wanted to fill this chamber with something, at the time, but I'm very happy with the way it came out. The rings on the tube are gold foil tape.


The regulator really held up the works for a bit. It took me a while to come up with something that I liked. This looks much better in real life; its about half the size of this pic and you can see the subtle color variations which are washed out of the photo. I had thought about running tubes and wiring from it, but decided to go with a much cleaner image.

 
The butt was mostly just a paint job and a decorative button on the bottom. I had toyed with a gold doylie and even some adhesive patterns, but I decided to stick with a simple design. One of the reasons was that the adhesive started to fail and the applications would peel at the edges. Instead of risking my paint job, I went simple; which I think looks pretty good.
 
The butt did have a wood texture molded into it, which I enhanced with a black undercoat and then dry brushed on a wood color. I used a little bit of color and then dragged it over the grooves and black coat.
 
So, that is it in a nutshell. Definitely one of my favorite and challenging pieces. Hope you like it.
 
Keep zap'n...

Tuesday, January 22, 2013

Steampunk Hip Hop...no really...

I guess it was only a matter of time before Steampunk and Hip Hop met and had a child...Professor Charles Elemental...


Not exactly sure how I happend upon Professor Elemental, but he is awesome...Here is the first video that I stumbled upon.

http://www.youtube.com/watch?v=0iRTB-FTMdk

Prof. Elemetal also has a website:

http://www.professorelemental.com/fr_home.cfm

Monday, January 7, 2013

How To Make A Raygun Lighter...

Found this on Youtube and thought that it was a pretty cool tutorial on how to build a raygun shaped lighter. Definitely got some ideas from this. Enjoy...

http://www.youtube.com/watch?v=rOzgYbUnExo&list=PLTy4q5D78jWh_j8cygz2iDAVc5BmHaywZ