Wednesday, February 20, 2013

Ray-Rifle

BY JOVE, IT IS FINALLY FINISHED!!!


THE EXTINCTOR

This is actually one of the original projects that I started when I took up this hobby, about two years ago(?). I took a number (a rather large number) of very long breaks while building this piece and would come back to it when I was stuck on other projects. The Extinctor is a toy mod, and definitely the most ambitious piece I've made so far. It measure 29 1/2 inches long and is almost entirely repurposed toys.

Sadly, I wasn't taking WIP picks when I started this project, so I do not have any behind-the-scenes shots. I do have a number of detail pics, since I had to stand pretty far away to get the entire piece in the above picture.


There are so many cool parts to this piece, but the barrel is definitely one of my favorites. It is mostly a single toy mounted on a curtain rod. It is a very strange toy, and I would laugh very hard if someone actually recognized it.
 
 
This part was the most fun to build, because it is completely from scratch, and is made up a number of toys and what-nots that just kinda came together to form the antennae assembly.
 

The gear box was one of the last things I added; I wasn't really working with gears much when I first started this hobby. This was a solid piece that you pumped like an air gun. I cut out the "window", which was where a logo sticker used to go, and added some decorative doylie and gears. Its topped off with some blister-pack plastic, which is very light-weight and pretty easy to work with. Love the blister-pack material.


The crystal chamber is on the other side of the gear box, and not visible from the main picture. I had some crystals and other wierd parts lying about, so I thought I'd put them together and see what I got. Well...I got that. Not my favorite part, but its kooky, so I like it.

 
I really wanted to fill this chamber with something, at the time, but I'm very happy with the way it came out. The rings on the tube are gold foil tape.


The regulator really held up the works for a bit. It took me a while to come up with something that I liked. This looks much better in real life; its about half the size of this pic and you can see the subtle color variations which are washed out of the photo. I had thought about running tubes and wiring from it, but decided to go with a much cleaner image.

 
The butt was mostly just a paint job and a decorative button on the bottom. I had toyed with a gold doylie and even some adhesive patterns, but I decided to stick with a simple design. One of the reasons was that the adhesive started to fail and the applications would peel at the edges. Instead of risking my paint job, I went simple; which I think looks pretty good.
 
The butt did have a wood texture molded into it, which I enhanced with a black undercoat and then dry brushed on a wood color. I used a little bit of color and then dragged it over the grooves and black coat.
 
So, that is it in a nutshell. Definitely one of my favorite and challenging pieces. Hope you like it.
 
Keep zap'n...

Tuesday, January 22, 2013

Steampunk Hip Hop...no really...

I guess it was only a matter of time before Steampunk and Hip Hop met and had a child...Professor Charles Elemental...


Not exactly sure how I happend upon Professor Elemental, but he is awesome...Here is the first video that I stumbled upon.

http://www.youtube.com/watch?v=0iRTB-FTMdk

Prof. Elemetal also has a website:

http://www.professorelemental.com/fr_home.cfm

Monday, January 7, 2013

How To Make A Raygun Lighter...

Found this on Youtube and thought that it was a pretty cool tutorial on how to build a raygun shaped lighter. Definitely got some ideas from this. Enjoy...

http://www.youtube.com/watch?v=rOzgYbUnExo&list=PLTy4q5D78jWh_j8cygz2iDAVc5BmHaywZ

Sunday, December 30, 2012

Holiday Ray Gun

This gun has actually been on the shelf in the workshop for quite a while. I put it on hold while I finished up the last two pieces. I finally put the finishing touches on it while on Christmas vacation.


A big part of that was that I had designed myself into a corner; I wanted to included a power level setting dial, but didn't have much direction on how it should look. Soooo, it sat for a while until I came up with something that I liked.


The INENSITRON has a working dial and sits inside of the housing for a toy pirate compass.The housing is glued on to the wooden handle with the dial glued inside of that. The graphic looks much cooler at normal size and has a classic hand-drawn feel. The tubes (wiring) run from dial to the trigger, and one to the pressure gage.


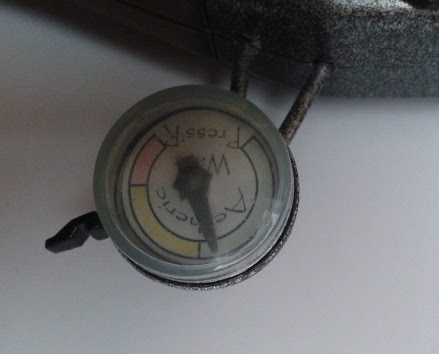
The pressure gage is an old standby in the workshop. I designed this on the computer a few years ago and keep a printed sheet with a dozen or so for whenever needed. The housing is a small toy compass top on a gumball machine toy container base. The meter hand is glued in place (in the safe position).

I'm not sure if I've mentioned this before, but scale is one of the biggest concerns when putting a piece together, and can really make or break a design. It is very easy to overwhelm a piece by adding something too thick or too wide for the rest of the gun. Also, if a piece is too small, then that can be just as distracting; leaving large boring spaces on the gun. So, I toy around with stuff all the time, trying to find the right scale parts for each piece. It probably is the most lengthly part of the entire process, for me.

Keep zap'n...


Saturday, December 22, 2012

Classic Ray Gun


This is definitely one of my favorites, and is ironically, one of the simplest pieces I've done, so far. I toyed with the idea of adding bells and whistles, but I decided to keep it simple, and I'm glad I did. Using a new grip pattern for this gun; not as twisty and exotic as the previous handles I've cut, but it fits nicely.

The trick with any handle, is to make sure you leave enough room for screws to secure it to the base, while leaving room for a trigger.


Again, working with a lot of clear material as much as possible. I find painting transparent materials very rewarding for some reason; its like revealing the invisible man in the old black&white horror movies. Anyway, some metal paper fasteners, for rivets and electrical tape for bands.

The barrel is a wooden candle stick. I used an exacto-knife to cut a groove for the fin to fit into. The fin is plastic cut from a plastic container lid. Wood takes spray paint a lot differently than plastic, or metal, and the end result can sometimes be hard to predict. In this case, I skipped the black undercoat, and went with just primer and bronze spray paint. The wood gave the paint a rough finish which definitely gave it the look of a used and often-handled weapon.

I had toyed with a new power level setting dial on the back end, but I couldn't get the mechanics to work with unscrewing itself and leaving hardware in the body of the gun. So, I just added some flair to the end and called it good. I will likely try building the power selector again, once I spend some time in my local hardware store, looking for pieces to make it work.

Hope you like it.

Keep zap'n.


Sunday, December 16, 2012

Dirigible Days

http://www.day304.com/dirigibledays.html


Came across this yesterday and thought this low budget web series had a lot of heart. Some very neat steampunk models and props and good effects. If steampunk is your thing, then check it out...

Thursday, December 13, 2012

Deco Rocket


This is one of those projects that just comes out of nowhere. I knew that I wanted to eventually make some steampunk rocketships, but I hadn't given it too much thought; I usually just kind of tooled around with pieces to see what fit well together. I just decided to bite the bullet last weekend, and put this together in about two days.


I intentially didn't take any WIP pics, because I knew I would be tempted to post them. I felt like seeing the process might diminish the final result, so no WIP photos. It is mostly plastic, with some metal pieces for detail and flair. It is very light and I had to glue a giant steel washer to the bottom of the rocket, to keep it from teetering on the base.

The rocket detatches easily from the base, which is made of found plastic items, wood, and some metal.


You can't really see the wood from here, but I added a clear coat first so that it would mask the grain when I painted it. A very fun piece to make and a very rewarding finished sculpture.